The Aussie Garage and Shed Makeover Guide
By the I Do It Yourself team — Mick (lead), Cal and Ash.
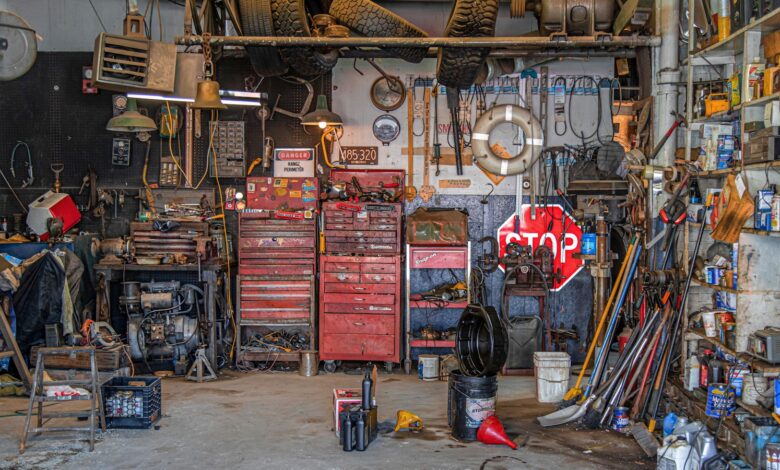
The Australian garage is where ambition goes to die. Half of it is a museum of broken sporting goods, the other half is technically a workshop but you can’t reach the workbench without moving three boxes labelled “garage stuff 2019”. This guide is for the homeowner who wants to reclaim it — turn it into a working garage with proper storage, a usable bench, decent lighting, and a roller door that actually opens reliably. Same playbook works for a Stratco or Absco backyard shed.
Realistic DIY budget is $1,000 at the bottom end (declutter, second-hand shelving, a basic bench top on saw horses, a couple of LED battens) up to $5,000 if you’re going proper (Bunnings Pinnacle racking, a built-in workbench with vice, sub-circuits for power tools done by a sparky, automatic garage door opener, ventilation fan). Timeline is 3 to 6 weekends across a couple of months — declutter first, then build out, then power, then finish. Don’t try to do it in one weekend; you’ll end up with a worse mess than you started with.
What you’re getting into
A garage makeover is three projects stacked. There’s a logistics project (sorting, storing, getting rid of the broken treadmill), a build project (shelving, bench, hooks), and an electrical project (lighting, powerpoints, maybe a sub-board if you’re running a welder or a compressor). The first two are entirely yours. The third has a hard line.
What you can DIY: All the storage, all the bench work, swapping like-for-like LED battens for existing fluoro tubes (the fitting stays, just the tube changes), hanging things, sorting, painting, sealing the floor. What needs a sparky: Any new circuit, any new powerpoint, any change to the switchboard, hard-wiring a 240V tool, anything that involves cutting into existing cabling. The Electrical Safety Act is clear and the insurance implications are real — if a fire starts in your garage and the assessor sees DIY wiring, your claim is gone.
One realistic constraint before you start: the garage has to keep functioning while you do this. The car still has to fit. The tools still have to be accessible. So you work in zones, one at a time, and you keep the rest functional. Don’t pull everything out into the driveway on Saturday morning hoping to be done by Sunday. You won’t be, and you’ll be sleeping next to a pile of stuff for a week.
Tools and budget
- Cordless drill + impact driver (Ryobi One+ kit, Makita LXT, or Milwaukee M18) — $300–$700
- Stud finder for double-brick or plasterboard-lined garages — $40–$80
- Hammer drill + masonry bits (concrete + brick walls) — $80 if you don’t own one
- Spirit level (1200mm for shelving, 600mm for general) — $50
- Tape measure (8m), pencil, square, utility knife — $50
- Step ladder (1.8m) and platform ladder (2.4m) — $200 for the pair
- Storage: Pinnacle racking ($150 per 1.8m bay), pegboard ($60 per panel), heavy-duty hooks ($30 set), clear tubs ($8–$15 each, Sistema or Decor) — $400–$1,500
- Workbench: build-it-yourself frame from 90×45 pine + 25mm structaply top ($250 in materials), or Sidchrome / Bunnings ready-made ($400–$1,200)
- Vice (Record-style 100mm or 125mm) — $120–$250
- LED battens (Crompton or Pierlite, 36W 1.2m) — $40 each, you’ll want 2–4
- Garage door opener (Merlin or B&D, sectional or roller) — $400–$700 supply only, $200 install if you don’t DIY
- Floor paint or epoxy (Wattyl Solagard Epoxy or Berger Jet Dry) — $200 for a single garage
- Total: $1,000 (lean) to $5,000 (proper) DIY
Phase 1: Declutter and zone
Mick: You can’t make a garage better until you know what’s actually in it. The first weekend is a dump-and-sort. Pick a Saturday with decent weather, pull everything onto the driveway, sort into four piles: keep, donate, sell, tip run. Be brutal. The treadmill you haven’t used since 2017 is not coming back into the garage. The half-tin of paint from the previous owner’s renovation is going to the council chemical drop-off, not back on the shelf.
Once you know what you’re keeping, zone the garage on paper before you build anything. Standard layout for an Aussie single garage: car bay down the middle, long-term storage on the back wall (sealed tubs on shelving, things you touch twice a year), workbench on the side wall opposite the door swing, tools and current-project gear on the wall behind the bench, sporting and outdoor stuff near the roller door. Double garage you’ve got more room — usually one bay car, one bay workshop, with storage above both on overhead racks.
Mick: Two zones people forget: a “consumables” zone (oils, fuels, paints, chemicals — these need ventilation and ideally a metal cabinet, not stored next to the hot water unit), and a “wet/dirty” zone (mower, whipper-snipper, gardening, anything that comes back from a job covered in dirt). Keep them separate from your tool storage or you’ll cross-contaminate.
Phase 2: Storage and shelving build-out
Mick: Once you’ve zoned, build the long-term storage first. Why first — it gets the seasonal stuff (Christmas decorations, camping gear, winter doonas) off the floor and out of the way, which gives you room to work on the rest. The Bunnings Pinnacle racking is the workhorse of Aussie garages — $150 a bay, holds 250kg per shelf, takes 20 minutes to assemble, lasts forever. Two bays on the back wall covers most homes. If you’ve got more height, go for a third bay or add overhead racks.
Sealed plastic tubs (Sistema 39L or Decor Tellfresh 32L, both $12–$15) are the right call for anything you want to keep dry, dust-free and rodent-proof. Label every tub on two sides with a Sharpie or a P-Touch label. The labels are not optional. A garage full of unlabelled grey tubs is a garage you’ll dig through every weekend.
Mick: Pegboard wall above the workbench — the Bunnings 1200×600 pegboard panels, $60 each, screwed onto 19mm spacers (just rip a strip off some leftover pine) so the hooks can engage the back. Lay out the tools you use weekly on the pegboard, trace them with a Sharpie if you want the workshop-porn look, and hang them. Everything else lives in drawers or on shelves. The principle: the tools you use most often live where you can grab them without moving anything.
Cal: For the outdoor zone — the mower, the whipper-snipper, the long-handled stuff — wall hooks and a tool-rack are worth it. Long-handled tools propped in a corner always fall over and either break themselves or break something else. Five-second job to mount a Stanley garden tool rack and you’re done.
Phase 3: Workbench setup
Mick: A garage without a workbench is a storage unit. The bench is the centre of the workshop and it’s worth getting right. Three options. Cheapest — two saw horses and a sheet of 25mm structaply, $80 all up, surprisingly good for occasional use, takes down in 30 seconds when you need the floor space. Middle — build it yourself from 90×45 treated pine framing, 18mm ply or MDF top with a sacrificial 6mm hardboard sheet on top (replace the hardboard every couple of years), $250 in materials, three hours of work, lasts decades. Top — buy a Sidchrome or Bunnings prebuilt with drawers and a vice mount, $800–$1,500.
Whatever you build, get the height right. A bench too low destroys your back. Standard rule: bench top at the height of your wrist when standing relaxed — for most adult Aussies that’s 900–950mm. If you’re tall (over 6 foot) push it to 1,000mm. If you’re doing a lot of fine work (model-making, electronics) go higher; heavy hand-planing or sawing, go a bit lower.
Mick: Mount a vice. A 100mm or 125mm engineer’s vice (Record-style or the Bunnings Irwin equivalent) bolted through the corner of the bench top into the framing changes what the bench can do. Hold a piece of timber for cutting, hold a pipe for threading, hold a stuck bolt while you crack it. $150 well spent. And put a drawer or two underneath — even just an open shelf — for the things you reach for from the bench (combination square, marking gauge, tape, pencils, the vernier).
Cal: Lighting on the bench is a job for phase 4 but plan for it now — leave space above the bench for an LED batten, and run the pegboard wall up to within 200mm of the ceiling so the light gets behind it.
Phase 4: Lighting and power planning
Ash: Lighting in an Aussie garage is usually one or two old fluoro battens that buzz, flicker, and produce yellow light. Replace them. The like-for-like swap from a T8 fluoro tube to an LED tube of the same length is a DIY job in some states (you bypass the ballast or use a direct-replacement LED tube — read the instructions, they vary). The full fitting swap — taking down the old fluoro housing and installing a new LED batten — is licensed-electrician work in every Australian state. Don’t argue with me on this. AS/NZS 3000 (the Wiring Rules) is clear, and the cost of getting a sparky in to swap two battens is about $200 plus the fittings. Cheap insurance.
For a single garage you want at minimum two 1.2m LED battens (36W, 4,000 lumens each, 4,000K colour temp — not too warm, not too cold). One down the middle, one over the bench. Double garage, you want four. The over-bench one wants a separate switch so you can light the bench without lighting the whole garage at 11pm when the partner is asleep.
Ash: Power. Most older Aussie garages have one or two single powerpoints, usually in inconvenient spots. If you’re running power tools regularly — drop saw, table saw, compressor, welder — you want more outlets and ideally a sub-circuit on its own RCBO (combined breaker + safety switch) so a tripping tool doesn’t take out the house. That’s a switchboard job and a sparky job. Plan it now: tell your sparky how many outlets you want, where they go (above bench at 1,200mm, one at floor level near the door for the compressor), and whether you want any 15A or 20A outlets for bigger tools. A sparky visit for a garage power upgrade is typically $800–$2,000 depending on whether the run from the meter box is easy or hard.
Ash: Test the existing safety switch in the meter box before you start using power tools out there. If the test button doesn’t trip the RCD, you don’t have working RCD protection and that’s a problem. Get it sorted.
Phase 5: Doors, locks and ventilation
Mick: The roller door or sectional door is the most-used moving part on the house and it’s the one nobody services. Spring tension, track alignment, the rollers themselves, the rubber seal at the bottom — all wear, all fixable. If the door is slow, jerky, or the motor is straining, you need a service before you replace the motor. A garage door tech is $150–$250 for a service and they’ll catch a snapped spring before it strands you with a closed door at 6am on a Tuesday. Do not mess with sectional door springs yourself — they’re under serious tension and they’ll take fingers off. That’s a tech job.
The motor itself you can replace as a DIY if you’re confident — a Merlin Tiltmaster or B&D Controll-A-Door is a 3–4 hour install with the manual. Plug-in 240V, no hardwiring, so it’s within DIY scope. Mounting and alignment is the fiddly bit. If you’re not confident, $200 for the install.
Side door locks — replace the cylinder if you’ve moved in recently (see the first-home guide), and check the deadlock works. Most garage side doors have a tired old Lockwood mortice that hasn’t been keyed in 15 years and the previous owner’s tradie probably has a copy.
Cal: Ventilation matters more than people think, especially in Brisbane and the top end. A closed metal-roofed garage in February hits 50°C and stays there. A whirlybird on the roof is $80 and a half-day to install (or $250 with a roofer) and drops the peak temperature 8–10°C. If you’re using the garage as a workshop and you’ve got fumes (paint, glue, soldering) you want active extraction — a ducted fan vented to outside, sized to the garage volume. Sparky job to install but a quick one.
Floor seal is the finishing touch. A poured concrete floor sucks in oil, paint, and dirt. A two-pack epoxy floor coat (Wattyl Solagard or Berger Jet Dry) goes on with a roller after a thorough acid-etch, takes a Saturday, and the floor is sealed for 10 years. Looks like a real workshop. About $200 for a single garage, $350 for a double.
The team’s verdict
If we were running a garage makeover tomorrow, we’d block six weekends and not try to compress it. Weekend one: dump-and-sort, zone planning. Weekend two: build long-term storage on the back wall. Weekend three: workbench and pegboard. Weekend four: book the sparky for the lighting and power, and use that lead time to do the floor seal. Weekend five: sparky comes in, lighting and power done. Weekend six: roller door service, side door locks, ventilation, finish-out — hooks, racks, the last detail bits.
The mistakes we see most often are buying too much storage gear too early (you don’t know what you need until you’ve sorted), trying to DIY electrical to save money (it’s the false economy that ends houses), and skipping the floor seal because it feels like a luxury (it’s not — it’s the difference between a workshop you want to be in and a dusty grey concrete bay). Done right, a garage makeover lasts 15 years before it needs another rethink. Done wrong, you’ll be back doing the same dump-and-sort in two years.
FAQs
Can I do the lighting and power myself? No. Anything beyond a like-for-like LED tube swap is licensed electrician work under AS/NZS 3000. Not worth the fire risk, the insurance void, or the fines. Get a sparky.
What’s the single best storage purchase? Bunnings Pinnacle racking, $150 a bay, 250kg per shelf, four shelves per bay. Two bays covers most single garages.
Should I insulate the garage? If it’s a brick veneer or Colorbond garage in QLD, NSW, NT or WA, yes — R2.5 batts in the ceiling cavity drops summer temps significantly. $300 in materials for a single garage, half a day to install yourself if there’s existing insulation paper to staple to. Cooler garage = tools last longer, paint stores better, you’ll actually use it.
Do I need permission to put a workbench / shelving in? No, it’s all furniture. Putting up a freestanding shed in the yard is a different question — under 10m² it’s usually exempt from council approval but check your local council’s planning scheme. Anything bigger needs a development application.
How do I keep mice out of the garage? Sealed plastic tubs for anything they could nest in (old clothes, cardboard, kids’ toys), don’t store pet food in the garage, seal the gap under the roller door with a brush strip ($40 from Bunnings), and put down a couple of snap traps in the corners. Don’t use bait if you’ve got pets that wander in.
Got a project we should write a guide for? Tell us.